
The first things user should have to perform, while you to create an eCommerce store, is to set up taxes in WooCommerce. Though setting up charges in WooCommerce seems to be a complicated matter to anyone, but in WooCommerce plugin, this process of setting up fees is straightforward.
WooCommerce tried to keep accounting services as straight as possible. Accounting services also consist of calculation of taxes, but the best thing of the plugin is, it can calculate automatically by just entering your requirements.
Enabling Taxes
At first, you have to check the “Enable Taxes” option that is “Enable taxes and tax calculations” inside the General Settings Tab
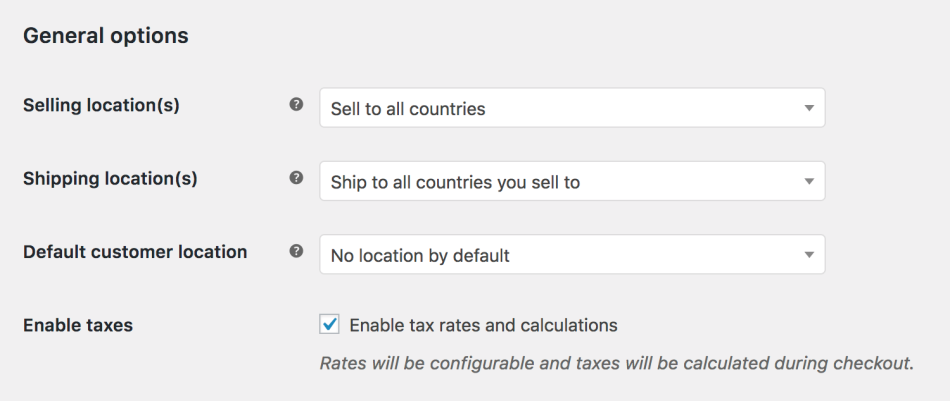
- Install and Activate WooCommerce on WordPress > Settings > General.
- Select the “Enable Taxes and Tax Calculations” checkbox.
- Save changes.
After Enabling the Tax rates and calculations there, you can see a new separate tab for “Tax” inside WooCommerce settings. You have to click on the “Tax” settings.
Configuring Tax Options
The path to configure Tax Option inside WooCommerce settings is:
WooCommerce –> Settings –> Tax.
This “Tax” tab is only visible if “Enable taxes and tax calculations” is enabled in the General settings.
Overview of “Tax Options”
Now, we will look into every setting in detail under tax options. At first, you have to decide how you want to input prices for your products.
Prices Entered with Tax
Two options with radio buttons are there, where you have to choose to keep the costs of your product inclusive or absolute of tax. If you decide to go with the second option, the costs of the products that you input will be exclusive of tax. If you select the second option that is “No, I will enter prices exclusive of tax,” then you have to calculate tax as a new price at the time of checkout.
Calculate Tax Based On
Next option is “Calculate Tax Based On,” will determine which location you are using to set up your tax form. There you can see three choices, and you can select any one of them. Below are the options.
- Customer shipping address.
- Customer billing address.
- Shop base address.
Shipping Tax Class
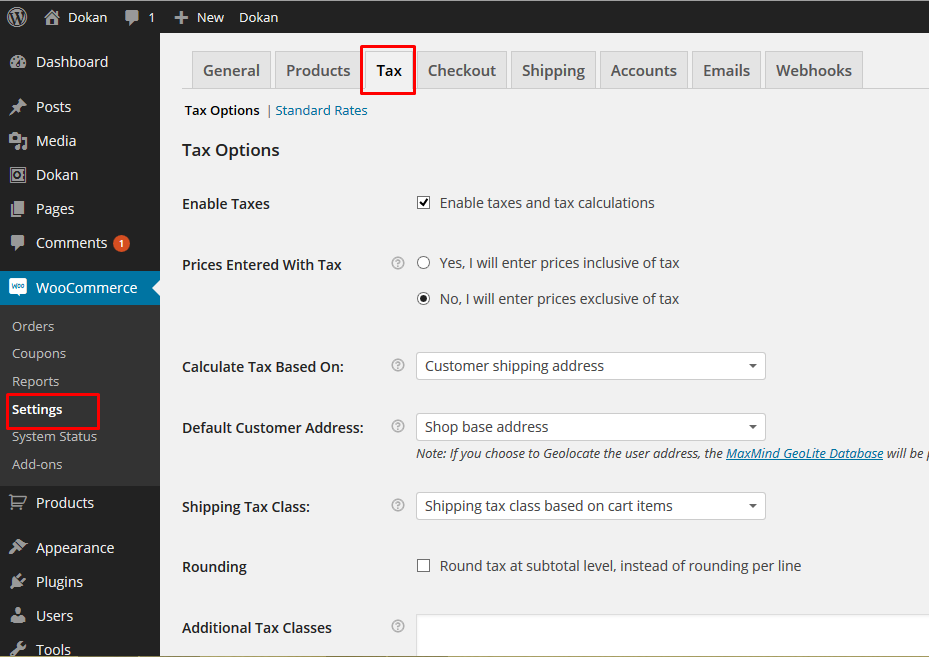
Next setting is “Shipping Tax Class” will determine how you can define Shipping Tax Class in your store. Shipping tax class depends on the item’s types in the cart. All products that you will add in your e-commerce store will not be at the same rate. There is a default option, that is “Shipping tax class based on cart items,” you can choose that too. If your tax jurisdiction doesn’t allow for that, then you can select Standard or any another shipping tax class, mentioned below –
- Shipping tax class based on cart items
- Standard
- Reduced Rate
- Zero Rate
- My Tax Class
Rounding
There is a checkbox for the option “Rounding.” It will determine tax rounding in the cart value. Tick the box if you want to round tax at sub-total level, instead of the default rounding per line option. But, in most e-commerce website it remains to untick.
Additional Tax Classes
Using this “Additional Tax Classes” option, you can create other tax classes based on your tax requirements. WooCommerce has already set two other tax classes that’s are,
- Reduced Rate
- Zero Rate
To develop new tax classes, enter the names (one per line) in the text field (without any commas and full stop). After saving the new tax classes, they will display as a tab on the top of the screen.
Display Prices in the Shop
By using this setting, you can choose the price, including tax or Excluding tax, which will display in your shop before adding them into the cart. Usually, this setting will be Excluding tax. Otherwise, the price, including tax, will show a high rate at your shopping store, compared to other competitors.
Display Prices During Cart and Checkout
This setting helps to show the value of the cart during the checkout. You can choose this same as “Display Prices in the Shop.” There are two options: one is including tax and other is excluding tax. You can choose what you want. It usually will be – Excluding tax.
Price Display Suffix
Price Display Suffix option for adding a suffix after the price of your products, it can be like “inclusive of VAT” or “exclusive of VAT.” If you want, then can select between the two option there – {price including _tax} or {price excluding tax}.
By default, it remains N/A
Display Tax Totals
The last option is “Display Tax Totals,” which you can set to Display the Tax Totals during checkout – you can display multiple taxes added together as one total or each one attached to the cart as a separate item. It usually will be – Itemized. Do not forget to click the Save changes button, after full customization.
Finishing Paragraph
This article covered the process of Setting up Taxes in WooCommerce. But remember, your tax calculations are dependent on the legal obligations of your store base and your selling location. It will be best to consult with a professional to get help if required.