
Office 365, a trending and popular email client used all over the world by a lot of people or organization. Microsoft Office 365 is productive and innovative platform to offer various useful solution to make the work of Office 365 users dynamic and resourceful. Here, I will discuss how to Import PST file to Office 365 Outlook.
Points to implement before processing Network Upload Method.
1) PST file sharing permission: For this, it requires to keep the entire PST files in a single folder if importing multiple data. Right-click on that particular folder and click on properties. Under sharing section, hit the share button. Choose everyone from the drop-down menu and click on Add–> Share. A new window will open, select the folder and click done.
2) Office 365 mailbox Import Export Role: Open the Office 365 and after login go to Exchange Online Admin center, under permission section of the Admin role, the various pre-assigned roles are observable in the Organization Management. To allocate a new permission, click on the plus (+) sign of that page. Define the name for the new role. Add the role (Mailbox Import Export) and members. Hit on Save.
Steps to Network Upload Method
1) Go Admin Centre–>Security and Compliance–>Data governance–>Import. After that, you will several options among which we need to choose the one which help us transfer the PST data. As we want our on-premise Outlook PST data to be are transfer to Office 365 cloud platform, therefore we will click on Upload PST files.
2) Import a new job to the Office 365
Click on +New Import Job. Provide the name for creating a new job and hit on Next. Select upload your data--> Next.
3) Copy the destination link to remote area (SAS URL)
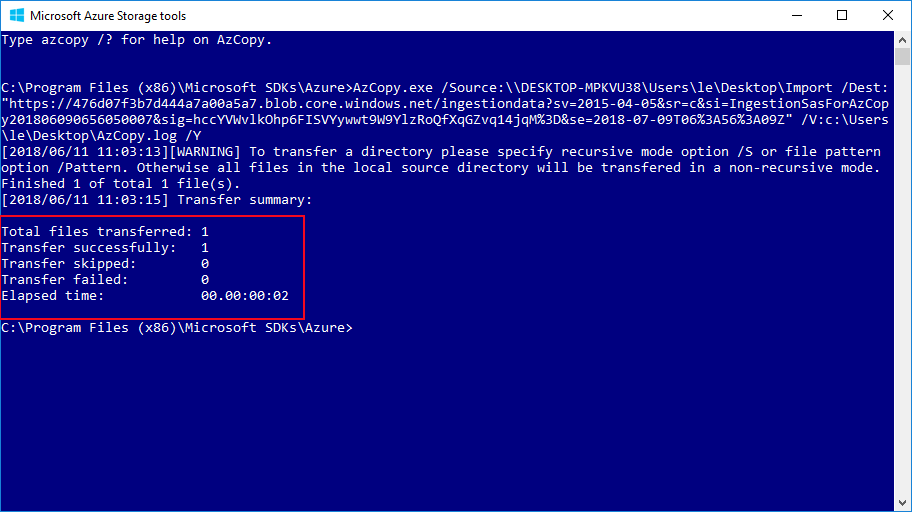
Click on copy to clipboard to get the SAS URL (a target link for moving PST data to the cloud). Hit on the Download Azure AzCopy, it will let to download this tool and Install it on your device.
4) Upload PST to Azure Storage area
Copy the given command to the notepad. In place of network path, provide the PST file folder location. Put the copied destination link as the SAS URL. Lastly, provide the location to save the log file.
AzCopy.exe /Source: network path /Dest: ”SAS URL” /V: give a location where you want to save log file \AzCopy.log /Y
After that paste the entire command to the Azure tool and execute it to upload the Outlook PST file to the Azure storage area.
5) Map the PST file.
Select the two given options “I am done uploading my files” and “I have access to the mapping files”. Click Next. Create CSV file with a specific format as given below.
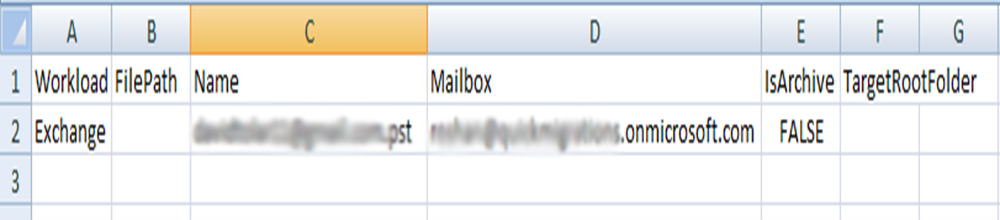
Under name, mention the PST file name. Provides the mailbox name where you are uploading the PST data. Workload should always be Exchange as Outlook works on Exchange server. Is Archive can be either true or false? If you are transferring PST to Archive mailbox it will be true else false. Target root folder should left blank. File path should always left black as the Azure tool always takes the data from its storage not the csv.
Now, click on +select mapping file and browse the created CSV file. Validate it as click on Save. If you create or save the CSV in wrong format then it will show an error.
After that, you need to go to the import job page. There you need to click on Ready to import to office 365 and filter data.
Above, the manual process of PST to Office 365 conversion provided by the Microsoft for Office 365 users.
What to do if the PST file to Office 365 manual solution does not work?
When it comes to upload, PST to Office 365 there is one more option that is the usage of the third party solution. There are several applications available in the market. Below you can find few points to understand why I am recommending you the third-party software to migrate PST file to Office 365 mailboxes. You may try the demo version from https://www.mailsdaddy.com/pst-to-office-365-migration-tool/.
- All solution in one single tool. Do not require other things to transfer PST file to Exchange Online Cloud environment.
- Suitable for any small or large size database as it allows migrating all sized PST files.
- Help you manage PST files in Exchange Online providing several options to export PST data to Office 365.
- Comfortable takes the Outlook on premise PST data and move to Office 365. It even does not require the presence of the MS Outlook.
- Allows you to preview the content of the PST files along with its attachments.
- You can see the migration process. You can even pause and resume the conversion process.
Final Verdict
Through this blog, I explained a manual method to import PST file to Office 365 Outlook using PowerShell. I also discussed one more solution that is the third-party solution to export PST to Office 365.

Hi, of course this article is in fact and I have learned lot of things from it regarding blogging.
Thanks.
I couldn’t refrain from commenting. Very well written!|
Everything is very open with a very clear description of the issues. It was definitely informative. Your site is very helpful. Thanks for sharing!|
Thanks for your such a nice words… do keep visiting again
Appreciate this post. Will try it out.